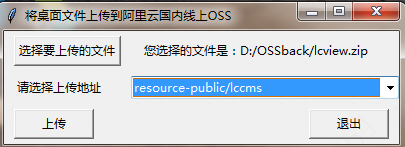
前端同事会甩过来一个zip包,然后我们需要将其解压,然后上传到阿里云OSS里对应的目录,为了提高效率,就用python 3写了一个GUI,如图:
具体代码如下:
1
2
3
4
5
6
7
8
9
10
11
12
13
14
15
16
17
18
19
20
21
22
23
24
25
26
27
28
29
30
31
32
33
34
35
36
37
38
39
40
41
42
43
44
45
46
47
48
49
50
51
52
53
54
55
56
57
58
59
60
61
62
63
64
65
66
67
68
69
70
71
72
73
74
75
76
77
78
79
80
#!/usr/bin/env python
# -*- coding:utf-8 -*-
# 作者:ChrisChan
# 用途:使用GUI上传阿里云OSS
import tkinter as tk
import tkinter.ttk as ttk
from tkinter import messagebox # 弹窗
# from tkinter import filedialog # 选择单独文件
from tkinter.filedialog import askdirectory # 选择文件夹
import oss2,os,sys,zipfile,time #引入zipfile解压
window = tk.Tk()
window.title("将桌面文件上传到阿里云国内线上OSS") # 窗体的标题
def confirm():
result = messagebox.askokcancel("请确认", '''本地文件是:%s,对应OSS路径是:%s''' % (filename,region1.get())) # 前面是弹窗主题,后面是弹窗内容
Des_path = region1.get()
fileroot = filename.split('.zip')[0] #获取文件路径,不含.zip后缀
print("上传zip包路径是:%s" % fileroot) # 获取要上传的文件路径
print("要解压的zip包名是:%s" % filename)
print("目标路径是:%s" % Des_path) # 获取目的完整路径
if result is True:
ak = "账号ak"
sk = "账号sk" # 秘钥
auth = oss2.Auth(ak, sk) # 鉴权
ossBucket = oss2.Bucket(auth, 'http://oss-cn-hangzhou.aliyuncs.com',Des_path) # 定义ossBucket
date = time.strftime("%Y-%m-%d", time.localtime()) #获取今天日期
#解压缩zip包
zFile = zipfile.ZipFile(filename, "r")
for fileM in zFile.namelist():
zFile.extract(fileM, "D:\OSSback")
zFile.close()
# 文件夹上传
def uploadFile(file):
remoteName = file.replace(fileroot,'').replace('\\','/')[1:] # 将“/”去掉
print('uploading...', file, 'remoteName:', remoteName)
result = ossBucket.put_object_from_file(remoteName, file)
print('http status: {0}'.format(result.status))
def list(dir):
fs = os.listdir(dir)
for f in fs:
file = dir+"\\"+f
if os.path.isdir(file):
list(file)
else:
uploadFile(file)
list(fileroot) # 开始上传
print("目标文件夹里所有文件上传完毕!")
#zip包改名
os.rename(filename,filename + date) #按日期重命名
def chooseZip():
global filename
filename = tk.filedialog.askopenfilename() # 选择单独的文件
if filename != '':
lb.config(text="您选择的文件是:" + filename)
else:
lb.config(text="您没有选择任何文件")
lb = tk.Label(window, text='')
lb.grid(row=0, column=1, sticky=tk.W, padx=10, pady=5)
btn = tk.Button(window, text="选择要上传的文件", command=chooseZip)
btn.grid(row=0, column=0, sticky=tk.E, padx=10, pady=5)
lb2 = tk.Label(window, text='请选择上传地址')
lb2.grid(row=2, column=0, sticky=tk.W, padx=10, pady=5)
number = tk.StringVar()
region1 = ttk.Combobox(window,width=35,textvariable=number,state='readonly') #下拉列表设置成为只读模式
region1['values'] = ('resource-public/lccms','resource-public/phoneAlarm','resource-public/lcview','resource-public/webFront/annualReport','resource-public/webFront/cancellation','resource-public/webFront/deviceShare','resource-public/webFront/discoverNews','resource-public/webFront/timeAlbum','resource-public/chenchenchen') #下拉列表里面具体的元素
region1.grid(row=2,column=1)
region1.current(0)
tk.Button(window, text='上传', width=10, command=confirm).grid(row=3, column=0, sticky=tk.W, padx=10, pady=5)
tk.Button(window, text='退出', width=10, command=window.quit).grid(row=3, column=1, sticky=tk.E, padx=10, pady=5)
tk.mainloop()
整个过程还是出现一个gui界面,然后传入zip包,然后将其在源目录下解压缩,并且上传到选择的OSS路径里,上传成功后将原zip改名已做备份。
最后吐槽一下,阿里云OSS的SDK里是没有文件改名的功能,只能复制一份然后靠上传新的顶替掉原来老的内容,这样很不友善…所以我才选择将zip包保留在本地。

